
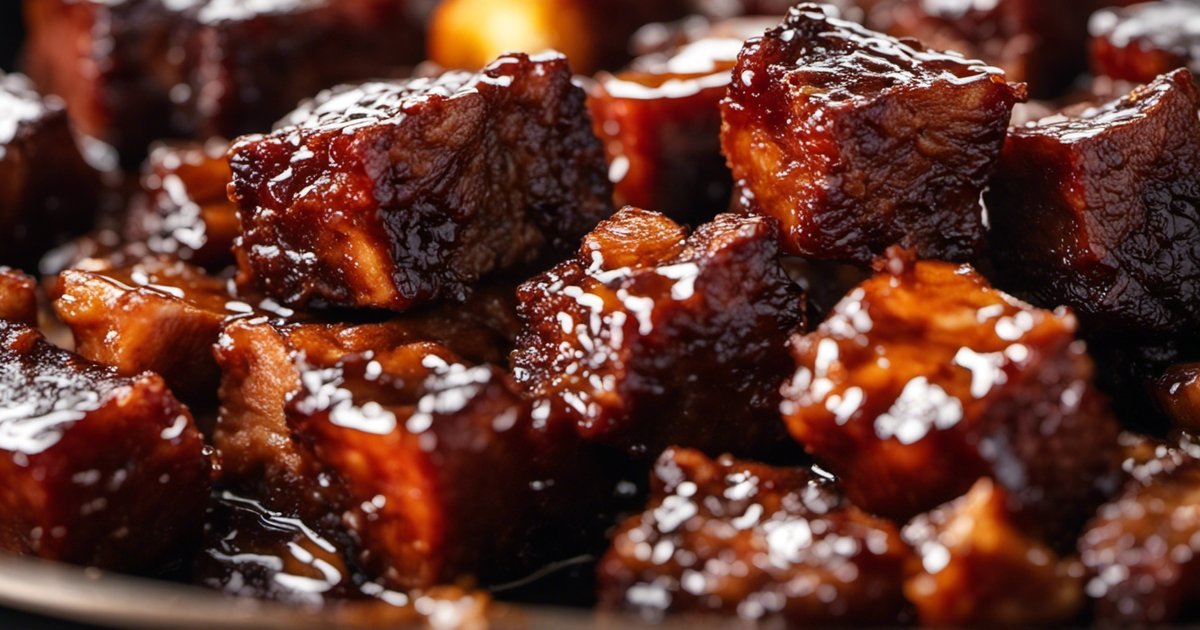
Imagine the tantalizing aroma of perfectly seasoned and tender steak bites, coated in a delicious BBQ rub and smothered in mouthwatering BBQ sauce, right in your own kitchen. No need for a grill or smoker – just your trusty oven. Try out these delicious recipes using our homemade BBQ rub and meat thermometer, and don’t forget to top it off with some mouthwatering BBQ sauce.
To make the perfect steak bites, begin by creating a delicious dry rub recipe for your beef cubes. This will guarantee that every bite is bursting with savory goodness. Then, it’s time to preheat the oven and arrange the seasoned steak bites on a foil-lined baking dish or foil pan. The aluminum foil helps retain moisture in this steak recipe while allowing the edges to crisp up beautifully, thanks to the BBQ rub or dry rub.
As the steak cooks low and slow in the smoker, you’ll be amazed at how the flavors of the bbq rub develop and intensify. Finally, when the internal temperature reaches that perfect degree of tenderness, after using the bbq rub and smoker, you’ll know it’s time to savor those delectable burnt ends.
So let’s dive into this method for making burnt ends in the oven and get ready to indulge in a truly delightful culinary experience, even if you don’t have a smoker.
Easy and Delicious Poor Man’s Burnt Ends Recipe
If you’re a smoker looking for a budget-friendly recipe that will delight your taste buds, then you’ve come to the right place. Making burnt ends in the oven doesn’t have to break the bank, and with this simple yet flavorful poor man’s burnt ends recipe, you’ll be able to enjoy tender and juicy meat without emptying your wallet. So let’s dive into how you can impress your friends and family with these easy-to-make, crowd-pleasing burnt ends.
Try out a budget-friendly recipe for flavorful poor man’s burnt ends.
Making burnt ends typically involves using expensive cuts of meat like brisket. However, our poor man’s version uses more affordable alternatives like chuck roast or pork shoulder. These cuts are just as delicious when cooked properly and provide a great option for those on a tight budget.
To make the poor man’s burnt ends, start by cutting the chuck roast or pork shoulder into bite-sized cubes. This allows for even cooking and ensures that each piece is packed with flavor. Season the meat with a simple yet delicious blend of spices such as salt, pepper, garlic powder, onion powder, and paprika. You can also add some brown sugar for a touch of sweetness.
Next, preheat your oven to around 275°F (135°C). Place the seasoned meat cubes on a baking sheet lined with aluminum foil or parchment paper to prevent sticking. Make sure to leave some space between each piece so they cook evenly.
Enjoy tender and juicy meat with a simple yet delicious seasoning blend.
Once your oven is preheated and ready to go, pop in the baking sheet with the seasoned meat cubes. Let them cook low and slow for about 2-3 hours until they become tender and develop that irresistible caramelized crust known as “burnt ends.”
During the cooking process, you may want to baste the meat occasionally with a tangy barbecue sauce to add extra flavor and moisture. Just be careful not to overdo it, as you don’t want the meat to become overly saucy or soggy.
Once your poor man’s burnt ends are done cooking, remove them from the oven and let them rest for a few minutes. This allows the juices to redistribute throughout the meat, resulting in a more flavorful and succulent final product.
Impress your friends and family with these easy-to-make, crowd-pleasing burnt ends.
Now comes the best part—serving up these mouthwatering burnt ends to your eager guests. Arrange them on a platter or in a bowl and garnish with some fresh herbs like cilantro or parsley for an added touch of freshness.
These budget-friendly burnt ends make for a fantastic appetizer or main course at any gathering or barbecue party. They’re sure to impress everyone with their tender texture, smoky flavor, and irresistible aroma. Serve them alongside some coleslaw, pickles, and cornbread for a complete meal that will have everyone coming back for seconds.
So why wait? Give this easy and delicious poor man’s burnt ends recipe a try today! You won’t believe how simple it is to achieve such incredible results without breaking the bank.
Step-by-Step Guide: Baked Chuck Roast Burnt Ends in the Oven
If you’re craving some mouthwatering burnt ends but don’t have access to a smoker, fear not! We’ve got you covered with this step-by-step guide on how to make burnt ends in the oven using a chuck roast. Follow our detailed instructions, and soon you’ll be enjoying tender, caramelized bites of meat that will leave your taste buds begging for more.
Slow-Cooking for Perfect Tenderness
To achieve that melt-in-your-mouth tenderness, it’s crucial to slow-cook the chuck roast in the oven. This method allows the meat to break down slowly, resulting in juicy and flavorful burnt ends. Here’s how you do it:
- Preheat your oven to 275°F (135°C).
- Season your chuck roast generously with your favorite dry rub or spices.
- Place the seasoned chuck roast on a baking rack set inside a roasting pan or baking dish.
- Cover the pan tightly with aluminum foil to trap the moisture and create a steamy environment while cooking.
- Slide the pan into the preheated oven and let it cook low and slow for about 3-4 hours until the meat is fork-tender.
Mastering Caramelization for Irresistible Flavor
The key to achieving those irresistible caramelized flavors lies in mastering the art of caramelization during cooking. Follow these steps to transform your chuck roast into delectable burnt ends:
- Remove the foil from the pan and increase the oven temperature to 425°F (220°C).
- Brush your favorite barbecue sauce all over the chuck roast, ensuring every inch is coated evenly.
- Return the uncovered pan back into the hot oven for an additional 15-20 minutes until a rich crust forms on top.
- Keep an eye on it during this time to prevent the sauce from burning. You want a nice caramelized exterior, not a charred mess!
The Finishing Touches
Once your chuck roast has achieved that beautiful caramelization, it’s time for the finishing touches to elevate your burnt ends to another level of deliciousness:
- Remove the pan from the oven and let the meat rest for about 10 minutes. This allows the juices to redistribute throughout the meat, ensuring maximum flavor and tenderness.
- Transfer the chuck roast to a cutting board and use a sharp knife to slice it into bite-sized cubes or chunks.
- Toss the cubes in any remaining barbecue sauce from the pan or drizzle some extra sauce on top if desired.
- Serve your homemade burnt ends as an appetizer, sandwich filling, or even as a main course alongside your favorite sides.
Now that you’ve mastered making burnt ends in the oven using a chuck roast, you can enjoy these delectable bites anytime without needing a smoker. So fire up that oven, follow our step-by-step guide, and get ready to impress your friends and family with these mouthwatering treats!
Exploring Different Cuts: Pork Belly Ribs vs. Sliced Pork Belly Bacon
Understanding the differences between pork belly ribs and sliced pork belly bacon is crucial. Each cut offers its own unique qualities that contribute to the final texture and flavor profile of the dish.
Differences between Pork Belly Ribs and Sliced Pork Belly Bacon
Pork belly ribs are larger, meatier cuts that come from the rib section of the pig. They have a higher fat content and are typically sold in slab form with bones intact. On the other hand, sliced pork belly bacon is cut into thin strips from the same pork belly but without bones. It has a higher ratio of meat to fat compared to pork belly ribs.
Achieving Desired Texture and Flavor Profile
To achieve those melt-in-your-mouth burnt ends with a perfect balance of tender meat and crispy edges, both cuts have their advantages. Here’s how they differ:
Pork Belly Ribs:
- Pros:
- The bones add additional flavor and moisture to the dish.
- The higher fat content results in more succulent and juicy burnt ends.
- Cons:
- The larger size requires longer cooking times.
- Some may find removing the bones cumbersome.
Sliced Pork Belly Bacon:
- Pros:
- The smaller size allows for quicker cooking times.
- The higher ratio of meat to fat creates a slightly leaner version of burnt ends.
- Cons:
- Without bones, there may be a slight loss of flavor compared to using pork belly ribs.
- The reduced fat content might result in slightly drier burnt ends if not cooked properly.
Ultimately, choosing between pork belly ribs or sliced pork belly bacon depends on personal preference and availability. If you prefer more intense flavors and don’t mind spending extra time removing bones, go for pork belly ribs. However, if you’re looking for a quicker cooking process and a slightly leaner version, sliced pork belly bacon is the way to go.
Considerations for Choosing the Ideal Cut
When selecting your cut of choice, keep the following considerations in mind:
- Flavor Preference: If you enjoy the rich and intense flavors that bones bring to the dish, opt for pork belly ribs.
- Cooking Time: If you’re short on time or prefer quicker cooking processes, choose sliced pork belly bacon.
- Fat Content: Consider whether you prefer a higher fat content (pork belly ribs) or a slightly leaner option (sliced pork belly bacon).
- Availability: Check what cuts are readily available at your local grocery store or butcher shop.
No matter which cut you choose, both pork belly ribs and sliced pork belly bacon have the potential to create delicious burnt ends in the oven. Experiment with different cuts to find your favorite combination of texture and flavor.
Mastering KC Brisket Burnt Ends: Oven Method
If you’re a BBQ enthusiast looking to impress your friends and family with some mouthwatering burnt ends, look no further! Get ready to tantalize your taste buds with the perfect balance of sweet, savory, and smoky flavors.
Learn How to Replicate Kansas City-Style Brisket Burnt Ends Using Your Oven
Making burnt ends in the oven is a fantastic alternative if you don’t have access to a smoker or simply prefer the convenience of using your kitchen oven. While traditionally cooked low and slow on a smoker, this method allows you to achieve similar results right in the comfort of your own home.
To get started, follow these steps:
- Begin by selecting a well-marbled beef brisket for that melt-in-your-mouth tenderness. Trim off any excess fat from the brisket.
- Season your brisket generously with a rub of choice. Opt for flavors that complement the rich beefy taste, such as brown sugar, paprika, garlic powder, onion powder, salt, and black pepper.
- Preheat your oven to 250°F (120°C). Place the seasoned brisket on a wire rack set inside a baking pan or roasting dish.
- Slow cook the brisket uncovered for approximately 5-6 hours until it reaches an internal temperature of around 165°F (74°C). This low and slow cooking process ensures tender meat while allowing enough time for those delicious caramelized crusts to form.
- Once the internal temperature is reached, remove the brisket from the oven and let it rest for about 15 minutes before proceeding.
- Cut the rested brisket into bite-sized cubes or chunks—these will be transformed into those irresistible burnt ends!
Perfectly Balance Sweet, Savory, and Smoky Flavors with Our Tried-and-Tested Technique
Now that you have your bite-sized brisket cubes ready, it’s time to infuse them with the perfect blend of flavors. Here’s how:
- In a mixing bowl, combine equal parts of your favorite BBQ sauce and honey or brown sugar. This mixture will provide that ideal balance of sweetness.
- Toss the brisket cubes in the sauce mixture until they are well-coated.
- Return the sauced cubes to the wire rack set inside the baking pan or roasting dish.
- Increase the oven temperature to 325°F (165°C) and place the dish back into the oven.
- Bake for an additional 45 minutes to 1 hour, or until the sauce has thickened and caramelized beautifully around each cube.
- Keep an eye on them during this final stage to prevent burning—after all, we want those burnt ends just right!
Impress BBQ Enthusiasts with These Authentic-Tasting, Melt-in-Your-Mouth Burnt Ends
Once your burnt ends are ready, get ready to impress everyone with their authentic taste and melt-in-your-mouth texture! Serve them up as a standalone dish or use them as a delicious topping for sandwiches, nachos, or even loaded fries.
Here are some key points to remember:
- The slow cooking process is crucial for achieving tender meat.
- The combination of BBQ sauce and honey/brown sugar adds depth and sweetness.
- Be patient during both cooking stages—the result will be worth it!
So go ahead and give this oven method a try! You’ll soon find yourself enjoying delectable Kansas City-style brisket burnt ends without ever needing a smoker. Get ready for a flavor explosion that will leave everyone craving more!
Selecting the Best Meat for Perfect Burnt Ends: Half a Pig Meat Box and More
To take your homemade burnt ends to another level, it’s crucial to start with high-quality meat cuts. One excellent option is to explore the world of half pig meat boxes, which offer a variety of cuts that can elevate your favorite BBQ dish.There are several options available that can make a significant difference in flavor and tenderness.
Various Options for Choosing Meat
When selecting the meat for your burnt ends, one popular choice is beef brisket. This cut is known for its rich marbling and deep flavor, making it an ideal candidate for creating mouthwatering burnt ends. However, don’t limit yourself to just brisket; there are other alternatives worth considering.
One option is to visit your local butcher and ask for their recommendations. Butchers have extensive knowledge about different cuts of meat and can guide you towards the best choices for making burnt ends. They may suggest cuts like chuck roast or short ribs, which can provide exceptional results when prepared correctly.
Benefits of Specific Cuts
Beef brisket remains a favorite choice due to its generous marbling and tender texture when cooked low and slow. The fat melts during the cooking process, infusing the meat with incredible flavors while keeping it moist.
Chuck roast is another excellent option that offers great taste and tenderness. It comes from the shoulder area of the cow and contains enough fat content to ensure juicy burnt ends. Similarly, short ribs are known for their rich marbling and succulent taste when cooked slowly.
Exploring Alternatives
While beef may be the go-to choice for many BBQ enthusiasts, don’t overlook other meats that can create equally delicious burnt ends. Pork belly is one such alternative that provides a unique twist on traditional burnt ends. Its fatty nature renders beautifully during cooking, resulting in tender, flavorful bites.
For those looking for a leaner option, consider using boneless chicken thighs. They are packed with flavor and become incredibly juicy when cooked low and slow. The smoky char on the outside pairs perfectly with the tender meat inside, creating a delightful contrast of textures.
Selecting the right meat is crucial for achieving exceptional results. Whether you opt for beef brisket, chuck roast, short ribs, pork belly, or even chicken thighs, each cut offers its own distinct flavors and textures that can elevate your favorite BBQ dish.
By exploring different options like half pig meat boxes or seeking advice from your local butcher, you can discover new and exciting cuts of meat to experiment with. So go ahead and get creative in the kitchen – your taste buds will thank you!
Essential Ingredients for Delicious Oven-Baked Burnt Ends
To create mouthwatering oven-baked burnt ends, you’ll need a few essential ingredients that will elevate the flavor profile and leave your taste buds begging for more. Let’s explore these key ingredients and ensure your pantry is stocked before embarking on your burnt ends journey.
A Flavorful BBQ Rub
One of the most crucial components of making delicious burnt ends is a flavorful BBQ rub. This blend of spices adds depth and complexity to the meat, creating a mouthwatering crust when cooked. Look for a BBQ rub that combines the perfect balance of salt, pepper, and other spices to enhance the natural flavors of the meat.
- Pros:
- Adds layers of flavor to the meat.
- Creates a delicious crust when cooked.
- Enhances the overall taste experience.
- Cons:
- Some store-bought rubs may contain additives or preservatives.
Tangy Barbecue Sauce
No burnt ends recipe is complete without a tangy barbecue sauce. This smoky and savory sauce adds richness and moisture to the meat, creating a delectable glaze that caramelizes beautifully in the oven. Look for a barbecue sauce that strikes the right balance between sweetness, tanginess, and smokiness.
- Pros:
- Adds moisture and richness to the dish.
- Provides a delightful caramelized glaze.
- Complements the flavors of the meat.
- Cons:
- Different sauces may have varying levels of sweetness or spiciness.
The Perfect Combination
The magic lies in finding the perfect combination of BBQ rub and barbecue sauce. When these two elements come together, they create an explosion of flavor that takes your burnt ends to new heights. Experiment with different ratios until you find your ideal balance—a harmony where each ingredient complements one another without overpowering.
- Key Information:
- Finding the right ratio is a matter of personal preference.
- Start with equal parts rub and sauce, then adjust according to taste.
Salt and Pepper
While the BBQ rub will already contain salt and pepper, it’s essential to have these basic seasonings on hand. They are the building blocks of flavor that enhance the taste of the meat. Use them sparingly to season your burnt ends before applying the rub for an extra layer of deliciousness.
- Key Information:
- Use kosher salt or sea salt for better flavor distribution.
- Freshly ground black pepper adds a robust kick.
Now that you know the essential ingredients for mouthwatering oven-baked burnt ends, make sure your pantry is stocked before diving into this culinary adventure. With a flavorful BBQ rub, tangy barbecue sauce, the perfect combination of flavors, and some basic seasonings like salt and pepper, you’re well on your way to creating a dish that will impress friends and family alike.
Enjoy Your Homemade Burnt Ends from the Oven
Congratulations! You’ve reached the end of our blog post on how to make burnt ends in the oven. By now, you should have a good understanding of the process and be ready to try it out for yourself. Making these delicious treats at home is not only easy but also incredibly rewarding.
Now that you know how to create mouthwatering burnt ends in your own kitchen, it’s time to gather your ingredients and get cooking! Invite your friends over for a BBQ feast they won’t forget. Remember, practice makes perfect, so don’t be discouraged if your first attempt isn’t flawless. Keep experimenting with different cuts of meat and flavors until you find your signature style.
So go ahead, fire up that oven, and let the aroma of perfectly caramelized burnt ends fill your home. Trust us, once you taste these homemade delights, you’ll never want to settle for anything less. Happy cooking!
FAQs
Can I use a different cut of meat instead of chuck roast?
Absolutely! While chuck roast is commonly used for burnt ends due to its marbling and tenderness when cooked low and slow, you can experiment with other cuts too. Brisket point or pork belly are popular alternatives that can yield equally delicious results.
Can I make burnt ends on a gas grill instead of an oven?
Definitely! The oven method provides convenience and consistent results, but if you prefer the smoky flavor imparted by grilling, go for it! Just ensure indirect heat and monitor the temperature closely to avoid drying out the meat.
How long do burnt ends last in the fridge?
If stored properly in an airtight container or wrapped tightly in foil, burnt ends can last up to 3-4 days in the refrigerator. However, we doubt they’ll stick around that long before being devoured!
Can I freeze leftover burnt ends?
Absolutely! Freezing burnt ends is a great way to preserve their deliciousness. Just make sure to wrap them tightly in foil or place them in an airtight container before freezing. They can last for up to 2-3 months in the freezer.
Can I use a dry rub instead of BBQ sauce?
Definitely! While BBQ sauce adds a tangy and sweet flavor, using a dry rub can create a beautiful crust on the burnt ends. Experiment with different spice blends and find your perfect combination of flavors.