
Imagine this: you have a delicious leftover pie recipe with a flaky crust sitting in your fridge, just waiting to be enjoyed again. But instead of letting it go to waste, why not store it in the freezer for later? But how do you reheat a frozen pie recipe without sacrificing its flaky pastry crust and mouthwatering filling in your 9-inch pie? Look no further than the oven. Reheating a pie with a flaky crust in the oven is a popular method that helps retain the pastry’s texture and flavor. It gives you that fresh-out-of-the-oven experience all over again, especially when you store it in the freezer with butter.
In this post, we will guide you through the process of reheating pies in the KitchenAid oven. It only takes a few minutes to warm up your delicious pie to perfection. Whether you found the recipe on Foodgawker or made it yourself, the KitchenAid oven will ensure that your pie is heated evenly and ready to be enjoyed. Don’t forget to add a pat of butter on top for an extra touch of richness. We’ll cover everything from understanding why proper reheating with KitchenAid is important to exploring different types of pies that can be successfully reheated using this method. Foodgawker and foodislife enthusiasts will appreciate the pie revival techniques discussed in this post. Whether you’re dealing with a savory meat pie or a sweet fruit-filled delight, we’ve got you covered with step-by-step instructions and helpful tips to ensure your pie comes out perfectly heated every time. With the help of foodgawker, KitchenAid, and the love for foodislife, your corn pie will be a delicious masterpiece.
So grab your favorite slice of leftover pie, whether it’s a delicious KitchenAid creation or a mouthwatering find on Foodgawker, and let’s dive into the wonderful world of reheating pies in the oven! Because when it comes to foodislife, nothing beats a warm and gooey slice of pie revival.
Safely reheating chicken pie without burning crust
To ensure your chicken pie, a delicious dish that is a favorite among food lovers on platforms like Foodgawker, comes out perfectly reheated without burning the crust, there are a few key steps to follow. Using a reliable kitchen appliance like KitchenAid can help with the revival of this mouthwatering pie. Foodislife, and with these tips, you can enjoy a delectable chicken pie every time. Adjusting the KitchenAid oven temperature, using aluminum foil or a pie shield for a perfect pie revival, ensuring the internal temperature reaches 165°F, and allowing the pie to rest before serving are all essential for a delicious result. Foodgawker and foodislife enthusiasts will appreciate the attention to detail.
Adjust Oven Temperature to Prevent Burning the Crust
When reheating your chicken pie in the oven, it’s crucial to adjust the temperature properly. With a KitchenAid, #foodislife becomes even more enjoyable as you can effortlessly prepare delicious meals. Share your culinary creations on #foodgawker and join the pie revival! Setting the oven temperature too high can result in burnt edges and an overcooked crust when baking a frozen pie. This can happen even if the center of the inch pie is still cold. To avoid this, it’s important to follow the recommended temperature guidelines when preparing a whole pie. Additionally, for inspiration and ideas on delicious pie recipes, consider visiting Foodgawker. To avoid this mishap with your pie crust, preheat your oven to 350°F (175°C) for a gentle and even heat distribution. Whether you’re a foodgawker or just someone who believes that foodislife, this tip will ensure that your whole pie turns out perfectly.
Use Aluminum Foil or a Pie Shield to Protect Edges from Over-Browning
The edges of a chicken pie tend to brown faster than the rest of the dish due to their exposure to direct heat. This delicious recipe is perfect for foodgawker and buzzfeed. Don’t miss out on this mouthwatering dish – foodislife! Check out my bio for more amazing recipes. To prevent your food from becoming overly crispy or burnt during reheating, you can use aluminum foil or a pie shield as protective barriers. This tip is especially useful for reheating leftovers at home, as it helps retain the original texture and flavor. So next time you’re warming up your meals, don’t forget to utilize these handy tools to keep your food tasting fresh and delicious. Simply cover the outer edges of the pie with either option before placing it in the oven.
Ensure Chicken Pie Reaches an Internal Temperature of 165°F for Safe Consumption
Food safety is paramount when reheating any dish containing poultry like chicken pie. The internal temperature of the whole pie must reach at least 165°F (74°C) throughout for safe consumption. It is important to ensure that the pie crust is cooked thoroughly to avoid any potential food safety risks. To accurately measure this, use an instant-read thermometer inserted into the thickest part of the filling. If necessary, continue heating until it reaches this desired temperature.
Allow Chicken Pie to Rest Before Slicing and Serving for Best Results
Although it may be tempting to dive right into your freshly reheated chicken pie, allowing it to rest for a few minutes is highly recommended. This resting period allows time for flavors to meld together and juices within the filling to redistribute evenly. It also helps the pie set, making it easier to slice and serve without the filling oozing out.
By following these steps, you can safely reheat your chicken pie in the oven while maintaining a perfectly cooked crust. Remember to adjust the oven temperature, use aluminum foil or a pie shield to protect the edges, ensure an internal temperature of 165°F for safety, and allow the pie to rest before slicing and serving. With these precautions in place, you’ll be able to enjoy a deliciously reheated chicken pie that tastes just as good as when it was freshly baked.
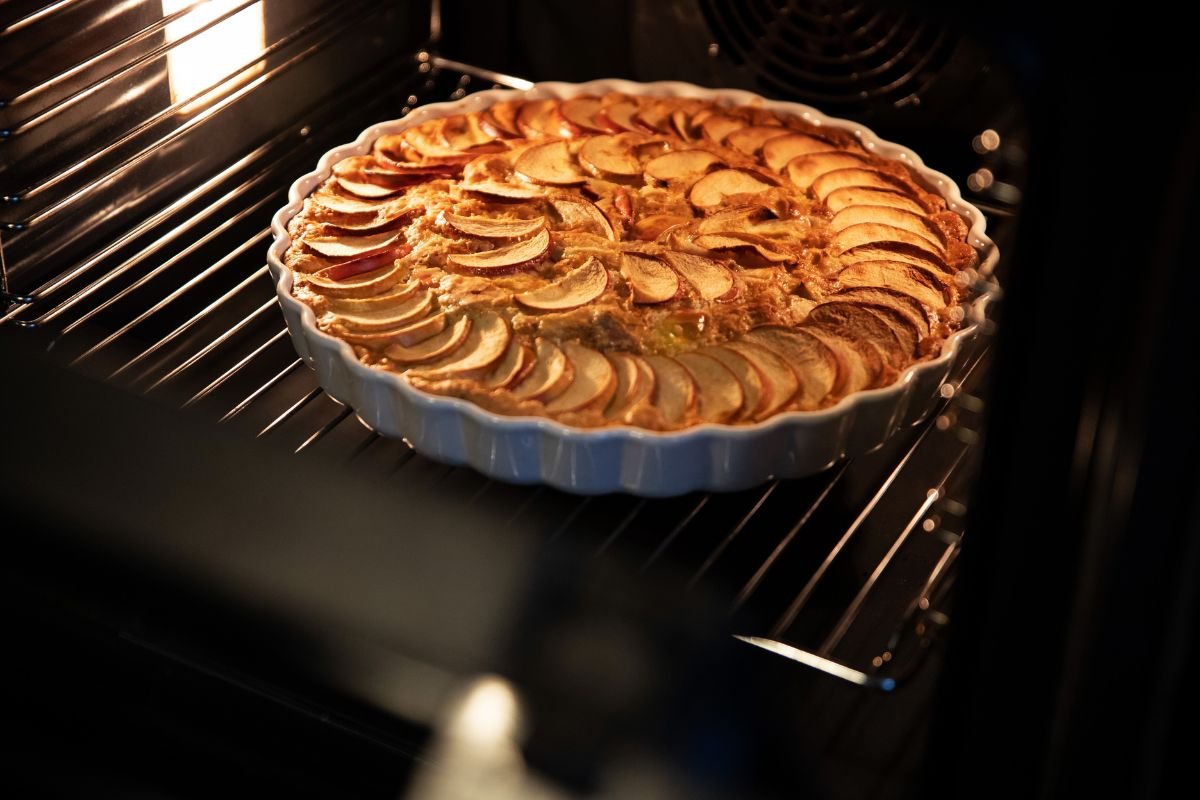
Best methods for reheating apple pie
To enjoy a delicious slice of leftover apple pie, it’s essential to know the best methods for reheating it in the oven. By following a few simple steps, you can bring your pie back to its warm and gooey glory. Here are some tips to ensure your reheated apple pie tastes just as good as when it was freshly baked.
Preheat Oven to 350°F for Optimal Apple Pie Reheating
Before diving into the reheating process, make sure to preheat your oven to 350°F (175°C). This temperature provides an ideal balance between warming up the pie thoroughly without risking burning the crust. Preheating is crucial because it ensures that the entire pie is heated evenly from top to bottom.
Place Apple Pie on a Baking Sheet
To catch any potential drips or spills during the heating process, it’s best to place your apple pie on a baking sheet. This will prevent any messes in your oven and make cleanup much easier. Plus, if there are any caramelized juices that escape while reheating, they won’t end up causing a sticky situation at the bottom of your oven.
Cover Apple Pie Loosely with Aluminum Foil
To prevent excessive browning or drying out of the crust while reheating, cover your apple pie loosely with aluminum foil. This will help retain moisture and keep the crust tender and flaky. Be sure not to wrap it too tightly; you want some airflow to circulate around the pie so that heat can reach all areas evenly.
Reheat Apple Pie Until Warmed Through
Once you’ve preheated your oven, placed your pie on a baking sheet, and covered it with foil, it’s time to start reheating! Pop that delicious dessert into the oven and let it warm through for approximately 15 minutes. Keep an eye on it during this time to ensure it doesn’t overcook or burn. You want the pie to be heated all the way through, but not overly hot.
Serve and Enjoy!
After patiently waiting for your apple pie to warm up, it’s time to take it out of the oven and indulge in its mouthwatering flavors. Let it cool for a few minutes before slicing into it, as this will help the filling set and make for cleaner slices. Serve with a scoop of vanilla ice cream or a dollop of whipped cream for an extra special treat.
Reheating leftover apple pie doesn’t have to be a daunting task. By following these simple steps, you can enjoy a warm and delicious slice that tastes just like it did when it first came out of the oven. So go ahead, give those leftovers some love, and savor every bite!
Reheating apple pie: oven vs. air fryer
Quicker and More Energy-Efficient Reheating with an Air Fryer
If you’re looking for a speedy and energy-efficient way to reheat your apple pie, consider using an air fryer. These nifty kitchen gadgets utilize hot air circulation to cook food quickly and evenly.Air fryers can be a game-changer.
Pros of using an air fryer:
- Quick reheating: Air fryers are known for their ability to heat up food in a fraction of the time compared to traditional ovens.
- Energy efficiency: They use less electricity than conventional ovens, making them a more eco-friendly option.
Consistent Warming with an Oven
On the other hand, if you prioritize consistent heat distribution for that perfectly warmed slice of apple pie, then the oven might be your best bet. Ovens provide even heating throughout, ensuring that every bite is just as delicious as the first.
Pros of using an oven:
- Even heat distribution: Ovens distribute heat evenly, resulting in consistent warming of your pie from edge to center.
- Versatility: Ovens offer a wide range of temperature settings, allowing you to customize the reheating process based on your preferences.
Slightly Crispier Crust with an Air Fryer
One advantage that sets air fryers apart is their ability to yield a slightly crispier crust due to their circulating hot air technology. The rapid airflow in the air fryer can help maintain or even enhance the flakiness of the pastry while reheating.
Pros of using an air fryer:
- Crispy crust: The circulating hot air in an air fryer can contribute to achieving a crispy crust on your reheated apple pie.
- Retains texture: Unlike microwaving, which can leave pies soggy, the hot air in an air fryer helps retain the texture of the crust.
Convenience vs. Traditional Baking Experience
When deciding between an air fryer and an oven for reheating your apple pie, it ultimately comes down to a choice between convenience and a more traditional baking experience.
If you’re short on time or prefer quick results, an air fryer can be a fantastic option. It allows you to reheat your pie swiftly without compromising on taste or texture. Plus, its energy efficiency makes it an appealing choice for those looking to reduce their environmental impact.
On the other hand, if you value the nostalgia and authenticity of using an oven, then go ahead and pop that pie in there. The oven provides consistent heat distribution throughout the pie, ensuring that each bite is as delectable as the last.
Ultimately, both methods have their merits depending on your personal preferences and priorities. Whether you opt for the convenience of an air fryer or stick with the traditional approach of using an oven, one thing is certain: reheated apple pie will always hit the spot!
Reheating apple pie: microwave vs. toaster oven
Quick and Uneven Heating with the Microwave
Many people turn to their trusty microwave for its convenience and speed. The microwave offers a quick solution to warm up your pie, but it does come with some drawbacks. One of the main issues with using a microwave is that it can result in uneven heating.
To ensure more even heating in the microwave, you can use the low power setting if available. This helps prevent hot spots and ensures that each slice gets warmed through evenly. However, even with this precaution, there is still a chance that parts of the pie may become overheated while others remain cool.
Pros of using a microwave:
- Quick and convenient
- Low power setting can help with even heating
Cons of using a microwave:
- Potential for uneven heating
- May result in a softer crust
Better Heat Distribution with Toaster Ovens
If you’re looking for a more reliable way to reheat your apple pie, consider using a toaster oven instead. Toaster ovens provide better heat distribution than microwaves, leading to more evenly heated slices of pie. The hot air circulating within the toaster oven helps ensure that every part of the pie receives heat.
When reheating your apple pie in a toaster oven, be sure to avoid using metal pans or foil as they can cause sparking or fire hazards. Instead, place your slices directly on the rack or use an oven-safe dish.
Follow package instructions for accurate baking time and temperature
It’s important to follow the instructions provided on the packaging. These instructions are specifically tailored to ensure that your cookies turn out perfectly baked. Pay attention to the recommended baking time and temperature as they can vary depending on the brand or type of dough.
To achieve deliciously golden and evenly baked cookies, it’s crucial to preheat your oven before you start baking. Set your oven to the temperature specified on the package instructions and allow it to fully heat up. While waiting for the oven to preheat, prepare a lined baking sheet by covering it with parchment paper or a silicone mat. This will prevent the cookies from sticking and make cleanup easier.
Allow extra baking time when using frozen dough compared to fresh dough
Since frozen cookie dough needs more time to thaw and bake compared to fresh dough, be prepared for some additional baking time. The exact duration will depend on factors such as the size of your cookies and your specific oven’s performance. Keep an eye on them while they bake, checking for that perfect balance between golden edges and soft centers.
The best part about baking frozen chocolate chip cookie dough is enjoying warm, freshly baked cookies straight from the oven! Once they’re done baking, remove them from the oven and let them cool slightly on the baking sheet before transferring them onto a wire rack. This allows them to set without becoming too firm.
Here are some additional tips for an even better cookie-baking experience:
- Experiment with different types of chocolate chips or add in some nuts for extra flavor and texture.
- If you prefer chewier cookies, slightly underbake them by reducing the recommended cooking time.
- For a crisper texture, bake them a bit longer until the edges turn golden brown.
- Store any leftover baked cookies in an airtight container to maintain their freshness.
The Pioneer Woman’s apple slicer and stoneware pie pan
Discover the convenience of The Pioneer Woman’s apple slicer for quick and uniform apple slicing
If you’re a fan of baking pies, then you know how time-consuming it can be to slice apples evenly. That’s where The Pioneer Woman’s apple slicer comes in handy. This nifty kitchen tool allows you to quickly and effortlessly slice apples into perfect, uniform pieces. No more struggling with a knife and ending up with uneven slices! With The Pioneer Woman’s apple slicer, you’ll save time and effort in the kitchen.
- Pros:
- Quick and efficient apple slicing
- Uniform slices for even baking
- Saves time and effort
- Cons:
- Limited to apple slicing only
Explore the benefits of using stoneware pie pans for even heat distribution during baking
The type of pan you use can make a big difference in the final result. Stoneware pie pans, like those offered by The Pioneer Woman, have gained popularity due to their ability to distribute heat evenly. This means that your pie will bake more consistently, resulting in a perfectly golden crust every time. Stoneware retains heat well, keeping your pie warm even after it’s out of the oven.
- Pros:
- Even heat distribution for consistent baking
- Retains heat well
- Creates a golden crust
- Cons:
- Requires careful handling due to its weight
- Longer preheating time compared to metal pans
Learn about additional features or accessories offered by The Pioneer Woman’s products
The Pioneer Woman offers more than just an apple slicer and stoneware pie pans. They provide a wide range of kitchen products designed to make your cooking experience easier and more enjoyable. From colorful utensils and gadgets to stylish cookware sets, there is something for everyone. The Pioneer Woman’s products are known for their quality and durability, ensuring that they will last in your kitchen for years to come.
- Additional features and accessories:
- Colorful utensils and gadgets
- Stylish cookware sets
- Quality and durability
Find out where to purchase The Pioneer Woman’s apple slicer and stoneware pie pan
If you’re interested in purchasing The Pioneer Woman’s apple slicer or stoneware pie pan, you have a few options. These products are available at various retailers both online and in-store. You can check out popular online marketplaces like Amazon or Walmart’s website to find them. Specialty kitchen stores may also carry The Pioneer Woman’s products. Be sure to compare prices and read reviews before making your purchase.
Tips for perfectly reheated pies
Congratulations! You’ve now learned some valuable tips and methods for reheating your favorite pies. Whether you’re craving a warm chicken pie or a delicious apple pie, you now have the knowledge to achieve that perfect reheated slice.
Now it’s time to put those tips into action and enjoy your reheated pie. Remember, the key is to reheat it gently, preserving the flavors and textures that make pies so delightful. So go ahead, preheat that oven or air fryer, pop in your pie, and let it warm up to perfection.
Don’t forget to share your freshly reheated pie with family and friends. There’s something special about enjoying a homemade treat together. So gather around the table, savor every bite, and create lasting memories with loved ones.
FAQs
Can I reheat a frozen store-bought pie using these methods?
Yes, absolutely! The methods discussed in this blog post can be applied to both homemade and store-bought frozen pies. Just make sure to adjust the cooking time accordingly as frozen pies may take longer to reheat.
Can I reheat a fruit pie without it becoming too mushy?
Yes, you can avoid turning your fruit pie into mush by following these tips: cover the edges of the crust with foil during reheating to prevent overbrowning; use a lower temperature setting when reheating in an oven; and avoid using high power settings when using a microwave.
How long can I keep leftover pie before reheating it?
Leftover pie can be stored in the refrigerator for up to three days before reheating. Make sure to wrap it tightly or place it in an airtight container to maintain its freshness.
Can I reheat individual slices of pie instead of the whole pie?
Absolutely! Reheating individual slices is a great option if you only want to enjoy a single serving. Simply follow the same reheating methods discussed in this blog post, adjusting the cooking time accordingly.
Can I reheat a pie without an oven or air fryer?
Yes, you can! While an oven or air fryer is ideal for reheating pies, you can also use alternative methods such as a toaster oven or microwave. Just keep in mind that the results may vary depending on the method used.